An intro to Docker & the magic of containers

• 17 min read
So you've been hearing about containers, you have maybe even used a container, but you aren't quite sure what it is or what kind of magic was used to create such a thing? Fear not, I will provide a whistlestop tour of the fundamentals of containers and why they are so popular. The basics covered in this article should put us in good stead to start orchestrating multiple containers using tools such as docker compose or dare I even say kubernetes, which I will cover in a future post.
You can clone the Github repo intro-to-docker to follow along or just create the files as you go!
What is a container?
"What is the difference between a virtual machine and a container?" - This is the first question that pops in to most peoples heads when they start using or learning about containers.
Well, dear readers, I shall enlighten you! Docker describes a container as a "standard unit of software that packages up code and all its dependencies so the application runs quickly and reliably from one computing environment to another". So in layman's terms, we should be able to use docker containers across a range of host devices. Without worrying about hardware or environmental restrictions - requirements such as python virtual environments suddenly aren't as important anymore. The beautiful diagram below shows how multiple containers can be run on a single host.
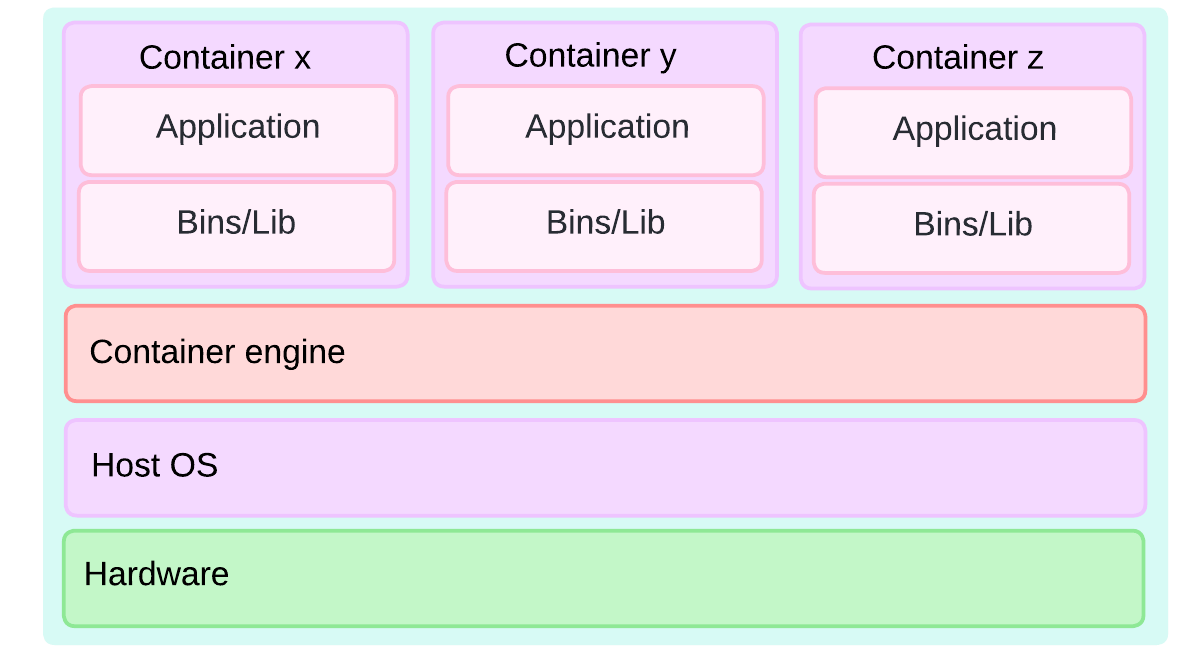
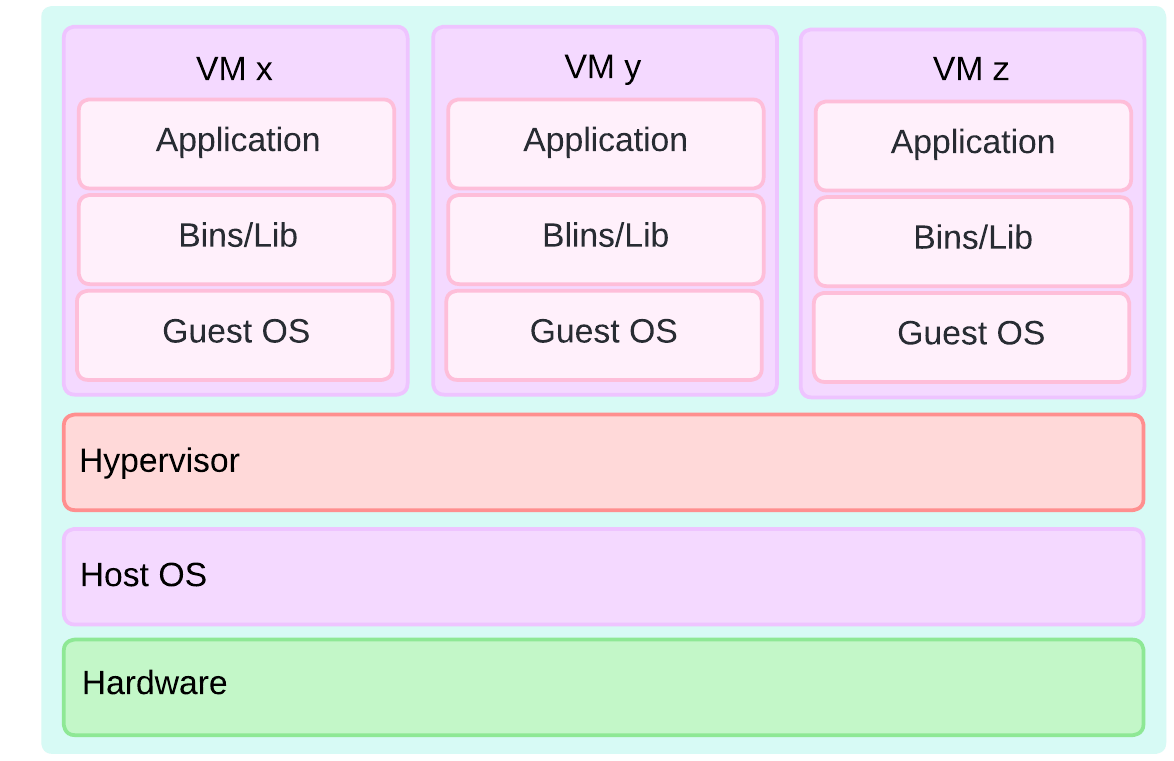
If we contrast this to a VM, we will see that a VM runs a full operating system, including kernel, whereas containers need only the app and a light operating system (Bins/Libs). This means the container should run consistently across any host sharing the same OS and CPU architecture. Again, another excellent diagram for you to enjoy, which shows some of the extra baggage that VM's require.
What is Docker?
We've covered why we might want to use a container instead of a VM, but you're still wondering why people often reference Docker containers or Docker images specifically? Docker itself is a tool used for managing and running containers, Docker Desktop and Docker Engine are frequently used. Docker Desktop comes with a desktop application for viewing images, containers and configuration details, whereas Docker Engine is the standalone "engine" which powers docker and can be used on Linux - you don't need to install both, Docker engine comes packaged with Docker Desktop.
Docker Desktop alternatives
Docker is the #1 tool for running containers and apparently the #1 overall tool for developers! Now with most tech companies enforcing Macbooks on its employees it's worth mentioning a few alternatives to Docker Desktop. So if you are feeling a bit different then you may want to review some of the other options:
I have recently moved over to using orbstack and it's worked exceptionally well on a Macbook with Apple Silicon and most of the terminology is shared due to the Open Container initiative (OCI) which ensures an industry standard for container formats and runtimes. Orbstack have this handy comparison to show why they're more efficient for Mac users: orbstack vs Docker Desktop.
Container registries
If you are familiar with git repositories, then this concept shouldn't be too difficult to grasp. A container registry is simply a publicly or privately available storage system where users can pull (download) or push (upload) container images.
The most popular and the self-declared world's largest container registry is Docker Hub, however there are other popular public container registries available to choose from. You may opt to store your images in one of these locations based on your requirements, for instance if your infrastructure is in Azure then ACR may be preferred, likewise if you're a GitHub house then it may slot into your CI pipeline easier to use GitHub Container Registry (GHCR):
How to use a private container registry
Most private registries will require authentication before you are able to pull (download) or push (upload) to the container registry. You can use docker login to login using a username and password or token as below:
TOKEN=<token>
echo "$TOKEN" | docker login registry.example.com -u <username> --password-stdin
By default a registry url can only have a single user/password combination, however there may be cases when you have multiple projects within a registry where you require a different user per project. If you require a different user within the same registry then you can add a specific docker login config.
TOKEN=<token>
echo "$TOKEN" | docker --config ~/.docker/special_dir login "registry.example.com" -u "username" --password-stdin
You can then specify the docker config to use by prepending it to your pull or run command as below:
docker --config ~/.docker/special_dir pull registry.example.com/testimage:latest
Build and Run
You've heard the saying "learn to walk before you run", well in this case "you need to learn to build before you can run". Ok, so technically this isn't true. You could learn to use containers by pulling the container image from a container registry and running the container, but where is the fun in that?
Image vs Container
Containers are created using "images", which you can think of as similar to an instance of an object in object-oriented programming, where the image would be the class and the container the object. An image is made up of layers, which you can create using a "Dockerfile", this is the source code for the image. You build the image of a container based on the instructions within the Dockerfile.
Whereas a container can be thought of as the "running" instance of the Docker image, similar to the way a running program is a version of the program files stored on your computer's SSD (or HDD if you're living in the past).
How to use a Dockerfile to create a Docker image
The Dockerfile can be viewed as the build document or recipe for the Docker image, each line of the document is called an "instruction". Although not mandatory it is conventional for them to be uppercase as detailed in the dockerfile overview.
In our example you will see that the first instruction is a FROM instruction, this creates a new build stage from a base image, I'm using ubuntu:22.04 as we haven't specified a container registry this will look in the default docker hub container registry for a matching image and tag.
FROM ubuntu:22.04
Next we will continue our build stage, note it's a build "stage" and not just a build. This is because we can use multiple FROM instructions, where each stage can reference the other if desired, why would you need to do that? Well young padawan, when you are ready we will move on to Multi-stage image builds, but this is a relatively advanced concept but can help drastically reduce the image size. This dark power allows you to build an image, use it in the next build stage while discarding/dropping any unnecessary artifacts. But we will delve into that another time, for now you can use docker guide for any further information.
Back to our Dockerfile, let's get up and running with a basic Ubuntu container that installs python, pip and a few python modules. We will then get it to run a basic python script, but remember the idea is we can swap out this basic script with whatever application you want and for any language or framework - such as a web server or even a network operating system!
# note: Dockerfile-exit in the repo

FROM ubuntu:22.04

# Install Python and pip
RUN apt-get update && apt-get install -y python3 python3-pip

# Setup a working directory that container will run from
WORKDIR /app

# Copy over any required files from your host
COPY requirements.txt .


# Install the requirements
RUN pip install --no-cache-dir -r requirements.txt
Note: create a requirements.txt file even if empty otherwise the copy will fail - or replace with any other file or folder!
Building the image
Lovely stuff, we have created our container recipe via a Dockerfile, now it's time to give it a taste! But to do that we first need to Build it. For both the build and run we will use the docker-cli, run the below command from the directory of your Dockerfile and likely where your application code lives.
Following along with the cloned repo? The files there are named
Dockerfile-exit,Dockerfile-cmdandDockerfile-entry, so point Docker at the right one with-f, e.g.docker build -f Dockerfile-exit --tag 'my-first-image-tag' .. If you're creating the file yourself and named itDockerfile, the plaindocker build .shown below works as-is.
$ docker build --tag 'my-first-image-tag' .     # where `.` references the current filepath for our Dockerfile
[+] Building 4.5s (10/10) FINISHED                                                                                                                                   docker:orbstack
 => [internal] load build definition from Dockerfile                                                                                                                            0.0s
 => => transferring dockerfile: 366B                                                                                                                                            0.0s
 => [internal] load metadata for docker.io/library/ubuntu:22.04                                                                                                                 0.3s
 => [internal] load .dockerignore                                                                                                                                               0.0s
 => => transferring context: 2B                                                                                                                                                 0.0s
 => [1/5] FROM docker.io/library/ubuntu:22.04@sha256:0e0a0fc6d18feda9db1590da249ac93e8d5abfea8f4c3c0c849ce512b5ef8982                                                           0.0s
 => [internal] load build context                                                                                                                                               0.0s
 => => transferring context: 37B                                                                                                                                                0.0s
 => CACHED [2/5] RUN apt-get update && apt-get install -y python3 python3-pip                                                                                                   0.0s
 => CACHED [3/5] WORKDIR /app                                                                                                                                                   0.0s
 => CACHED [4/5] COPY requirements.txt .                                                                                                                                        0.0s
 => [5/5] RUN pip install --no-cache-dir -r requirements.txt                                                                                                                    2.2s
 => exporting to image                                                                                                                                                          1.8s
 => => exporting layers                                                                                                                                                         1.8s
 => => writing image sha256:1b0a7ac54bc264982fb9dfd8ddad8f69c5c03367250f82541aab7869d6d26f3e                                                                                    0.0s
 => => naming to docker.io/library/my-first-image-tag
Run the image
We've successfully built our first Docker image from our 'recipe', now we can issue the docker run command to spin up the container. I've used the detached argument (or -d) so it runs in the background:
$ docker run  --name 'image-name' --detach 'my-first-image-tag'
0a442f01731474c97b4d9a7139c168e3f6293cb345c4fd953338ab1a05633b9c
Now it doesn't look like we've achieved anything because we ran it in detached mode, so to check on the state of the container we can run docker ps -a:
CONTAINER ID   IMAGE                                                                              COMMAND                  CREATED          STATUS                         PORTS                                         NAMES
0a442f017314   my-first-image-tag                                                                 "/bin/bash"              3 minutes ago    Exited (0) 3 minutes ago                                                     image-name
Oh no! It shows the container was created 3 minutes ago, but it also shows a Status of Exited!? This is expected, because our recipe only provided RUN statements. Once it gets to the end it simply exits, because we haven't told it to do anything else. If we add a CMD it provides a default for the container to execute, there can only be one CMD instruction per Dockerfile. In this example I have added a simple sleep infinity to keep the container up.
# note: Dockerfile-cmd in the repo

FROM ubuntu:22.04

# Install Python and pip
RUN apt-get update && apt-get install -y python3 python3-pip

# Setup a working directory that container will run from
WORKDIR /app

# Copy over any required files from your host
COPY requirements.txt .


# Install the requirements
RUN pip install --no-cache-dir -r requirements.txt

CMD ["sleep", "infinity"]
Now we can see the container stays up after it's run:
$ docker ps -a | grep "my-first"
17c534f2bffb   my-first-image-tag                                                                 "sleep infinity"         2 seconds ago        Up 2 seconds                                                                  image-name
From here we can open an interactive shell to the running container or issue a specific command:
$ docker exec -it image-name /bin/bash
root@17c534f2bffb:/app# ls -l
total 4
-rw-r--r-- 1 root root 8 Jul  2 10:35 requirements.txt
root@17c534f2bffb:/app#
CMD vs ENTRYPOINT
In our example we added a CMD instruction at the end which was simply to keep our container up so we can exec into it. In reality we would usually spin up our application instead. Now the CMD instruction is only executed if no other command is executed while using the container. So if we run our container with a different command we will see that it overrides our sleep infinity, runs the new command and in this case exits:
$ docker run 'my-first-image-tag' echo "New CMD and exit!"
New CMD and exit!
$ docker ps -a | grep my-first-image-tag
96301d586d61   my-first-image-tag                                                              "echo 'New CMD and e…"    15 seconds ago       Exited (0) 14 seconds ago
This is why you will often see the ENTRYPOINT instruction used to ensure the required command is always run - for example to ensure your web application is always started. Let's update our Dockerfile and test this out:
Note: This Dockerfile is not in the repo, but you can update the ENTRYPOINT instruction of Dockerfile-entry.
FROM ubuntu:22.04

# Install Python and pip
RUN apt-get update && apt-get install -y python3 python3-pip

# Setup a working directory that container will run from
WORKDIR /app

# Copy over any required files from your host
COPY requirements.txt .


# Install the requirements
RUN pip install --no-cache-dir -r requirements.txt

ENTRYPOINT ["sleep", "infinity"]
Now when we run an additional command we will notice that it attempts to pass the 'echo' and 'New CMD and exit!' to the sleep command - this is because any CMD after this is appended to the entrypoint instead and treated as a CLI argument to the "entrypoint":
$ docker run 'my-first-image-tag' echo "New CMD and exit!"
sleep: invalid time interval 'echo'
sleep: invalid time interval 'New CMD and exit!'
Try 'sleep --help' for more information.
Make them play nicely!
Awesome so you now know the difference between an ENTRYPOINT and a CMD instruction, but often you don't want your command to be passed to the entrypoint as an argument - you actually just want to run the CMD as a standalone command or script. A handy workaround for this is to create an entrypoint script which takes the command as the argument and executes it:
#!/bin/sh
echo "Entrypoint: running setup before handing off to CMD..."

exec "$@"
Now run this shell script as the entrypoint, ensuring you add a new COPY statement for the entrypoint script, notice the entrypoint script always runs first and takes whatever you pass to docker run as its argument, executing it after:
# note: Dockerfile-entry in the repo
FROM ubuntu:22.04

# Install Python and pip
RUN apt-get update && apt-get install -y python3 python3-pip

# Setup a working directory that container will run from
WORKDIR /app

# Copy over any required files from your host
COPY requirements.txt .

# Copy new entrypoint and make it executable
COPY entrypoint.sh .
RUN chmod +x entrypoint.sh


# Install the requirements
RUN pip install --no-cache-dir -r requirements.txt

ENTRYPOINT ["./entrypoint.sh"]
Now when we run this it will run our entrypoint script along with another command, it is passed as an argument and then executed by the script:
# First rebuild the image because we changed the 'recipe'
$ docker build . -t my-first-image-tag
[+] Building 0.8s (12/12) FINISHED                                                                                                                                                            docker:orbstack
 => [internal] load build definition from Dockerfile                                                                                                                                                     0.0s
 => => transferring dockerfile: 462B                                                                                                                                                                     0.0s
 => [internal] load metadata for docker.io/library/ubuntu:22.04                                                                                                                                          0.6s
 => [internal] load .dockerignore                                                                                                                                                                        0.0s
 => => transferring context: 2B                                                                                                                                                                          0.0s
 => [internal] load build context                                                                                                                                                                        0.0s
 => => transferring context: 69B                                                                                                                                                                         0.0s
 => [1/7] FROM docker.io/library/ubuntu:22.04@sha256:0e0a0fc6d18feda9db1590da249ac93e8d5abfea8f4c3c0c849ce512b5ef8982                                                                                    0.0s
 => CACHED [2/7] RUN apt-get update && apt-get install -y python3 python3-pip                                                                                                                            0.0s
 => CACHED [3/7] WORKDIR /app                                                                                                                                                                            0.0s
 => CACHED [4/7] COPY requirements.txt .                                                                                                                                                                 0.0s
 => CACHED [5/7] COPY entrypoint.sh .                                                                                                                                                                    0.0s
 => CACHED [6/7] RUN chmod +x entrypoint.sh                                                                                                                                                              0.0s
 => CACHED [7/7] RUN pip install --no-cache-dir -r requirements.txt                                                                                                                                      0.0s
 => exporting to image                                                                                                                                                                                   0.0s
 => => exporting layers                                                                                                                                                                                  0.0s
 => => writing image sha256:15efcf4b7e31051eebf86c4a1665292ecae60ba9df1b346f5c45929d70705809                                                                                                             0.0s
 => => naming to docker.io/library/my-first-image-tag

$ docker run 'my-first-image-tag' echo "Another command, taken as an argument to our entrypoint script and executed!"
Entrypoint: running setup before handing off to CMD...
Another command, taken as an argument to our entrypoint script and executed!

# container exited after executing our command:
$ docker ps -a | grep 'my-first-image-tag'
bb07dd889f15   my-first-image-tag                                                                 "./entrypoint.sh ech…"    9 seconds ago    Exited (0) 8 seconds ago
This is helpful if we want to run a short lived container where the entrypoint provides some of the required runtime setup/repeated tasks and also allows us to execute a command inside the container before exiting gracefully.
Alternatively we can still pass the sleep infinity either directly via docker run or by adding CMD ["sleep", "infinity"] to the Dockerfile, this allows the entrypoint to run initially and then allows us to use the container interactively:
$ docker run --detach 'my-first-image-tag' sleep infinity
67e03778742d03a28f0e35256f042447156428bb0dd638309d52f9a58fe56bdb
$ docker ps -a | grep 'my-first-image-tag'
67e03778742d   my-first-image-tag                                                                 "./entrypoint.sh sle…"    3 seconds ago    Up 2 seconds

$ docker exec -it <container-name or id> bash
root@67e03778742d:/app# ls -l
total 8
-rwxr-xr-x 1 root root 83 Jul 15 09:45 entrypoint.sh
-rw-r--r-- 1 root root  8 Jul  2 10:35 requirements.txt
I often do this if I'm trying to test scripts quickly, I can spin up the container exec into the shell, run the script, check any failures etc and then repeat.
Wrapping up
And there we have it - you've gone from wondering what all the container fuss was about to building your own images using recipes and Dockerfile instructions to running the containers - nice work! In my next post I will delve into multi-stage builds and show you how to slim down images by discarding all the build-time baggage you don't need at runtime.
$ comments